Building a Portfolio with Next.js and Notion API using ISR
Step-by-step guide to building a modern portfolio using Next.js and Notion API with Incremental Static Regeneration (ISR).
Posted by Felipe Giraldo
In this post, I want to show you how I built my personal portfolio using Next.js 16, Notion as a headless CMS, and Incremental Static Regeneration (ISR).
The idea was simple: have a fast, easy-to-maintain site that allows me to update content without touching code every time.
This approach is what I currently use in my portfolio and in several client projects.
What We're Building
A personal portfolio with the following features:
- Next.js 16 using App Router
- Notion API as content manager
- Incremental Static Regeneration (ISR)
- TypeScript
- Tailwind CSS
- Deployment on Vercel
Prerequisites
To follow this tutorial you need:
- Node.js 18 or higher
- pnpm (recommended), although npm or yarn also work
- A Notion account
- A Vercel account
Step 1: Initial project setup
I'll start with a template that already has the base project structure.
Clone the repository
Before running the project, it's necessary to configure Notion and environment variables.
Step 2: Using Notion as CMS
One of the reasons I use Notion is because it allows me to update content very comfortably, without additional admin panels.
Create the integration in Notion
- Go to Notion Integrations
- Create a new integration named Portfolio CMS
- Configure it as Internal
- Copy the integration token
This token will be our API access key:
Duplicate the databases
To not create everything from scratch, you can duplicate the template with the pre-configured databases:
Once duplicated:
- Open the page in your workspace
- In the three dots (top right), enter Connections
- Connect the Portfolio CMS integration
By doing this, the integration will have access to all databases within that page.
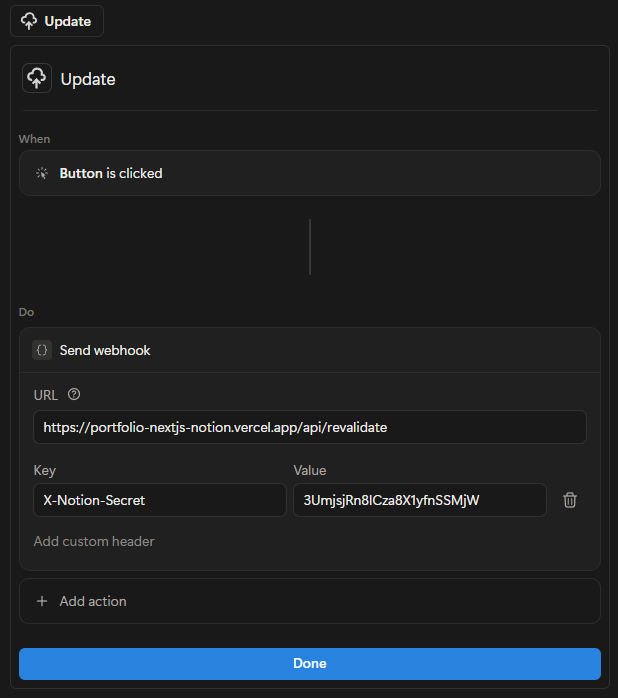
Configure the update button (manual ISR)
In production, the site doesn't update automatically. I prefer having total control over when to publish changes, so I use a button in Notion.
- In the duplicated page, configure the Update button
- Make sure it has the Send webhook action
- Configure the URL:
- Add the custom header:
You can generate the secret here: Online UUID Generator Tool
In local development, this step is not necessary.
Step 3: Environment variables
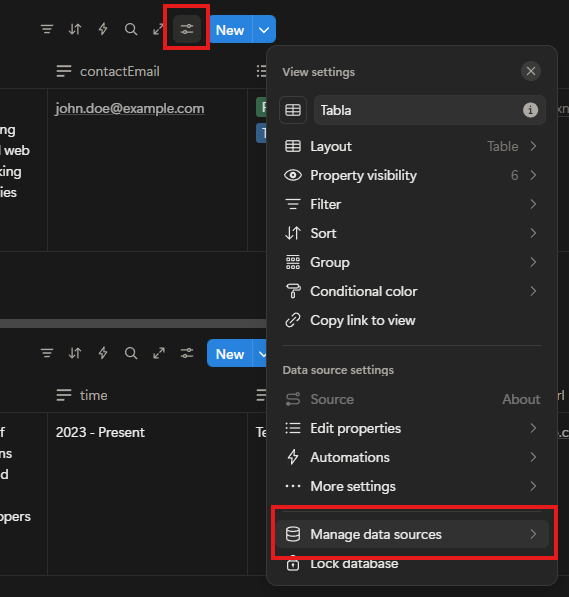
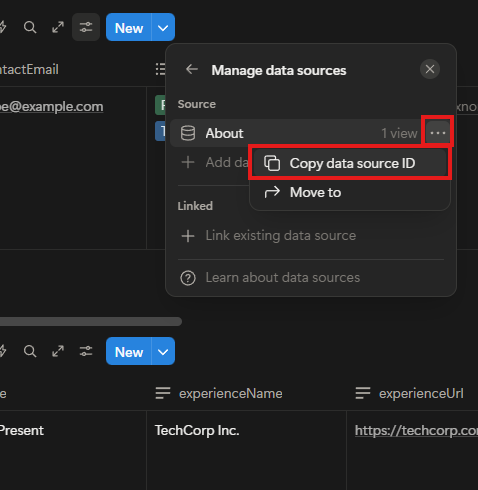
Get the database IDs
For each database:
- Open it in Notion
- Go to Settings
- Enter Manage data sources
- Copy the Source ID
Create a .env.local file with the following:
Run the project
Then open http://localhost:3000.
Step 4: Load your content in Notion
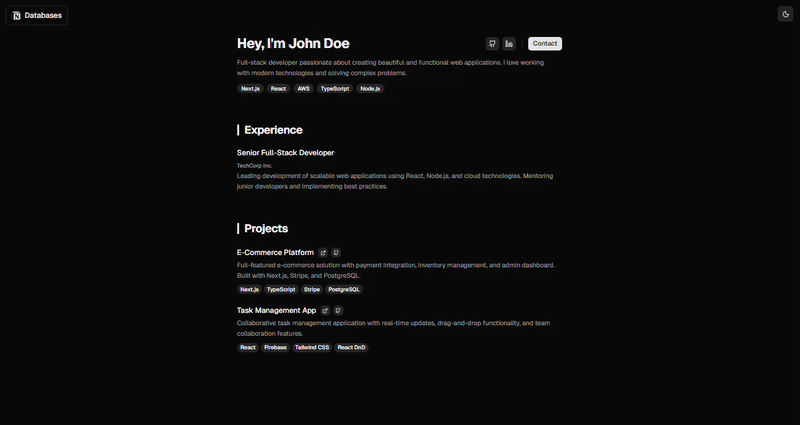
About
Here I place personal information:
- Name
- Bio
- Location
- Networks
- Skills
Experience
I use this database for my work experience:
- Company
- Role
- Dates
- Description
- External link
Projects
Here I add the projects I want to showcase:
- Name
- Description
- Images
- Demo and repository
- Technologies
Step 5: Deploy to Vercel
- Upload the project to GitHub
- Import it into Vercel
- Configure environment variables
The variables are the same as in .env.local:
How ISR works in this project
The site is generated statically and only updates when I decide.
What I gain with this approach
- Better performance
- Pages served from CDN
- Complete SEO
- Total control over publications
When content updates
- Locally: every change in Notion reflects automatically
- In production: only when I press the Update button in Notion
Customization
Styles and colors
Styles are centralized in app/globals.css.
You can also use TweakCN to adjust the Tailwind theme
Add new sections
When I need a new section:
- I create a new database in Notion
- I add the fetch in
lib/data/ - I create the component in
components/sections/
Common problems
Invalid API key
- Review the token
- Confirm the integration is Internal
Database not found
- Review the IDs
- Make sure the database is connected to the integration
Conclusion
This setup allows me to have a fast, clean, and easy-to-maintain portfolio, without depending on a traditional CMS.
Notion becomes the admin panel and Next.js handles performance.
It's a solid base that I also use for blogs, landings, and client sites.
In future posts I can show how to:
- Convert this into a complete blog
- Handle multiple languages with Notion
- Use this architecture for commercial projects
If you're interested in any of those topics, let me know.